Markforged MarkTwo Enterprise.
After the firmware/eiger upgrade saturday, 17 dec, wall print quality has deteriorated.
i have attached 2 images and the two .stl files for them.
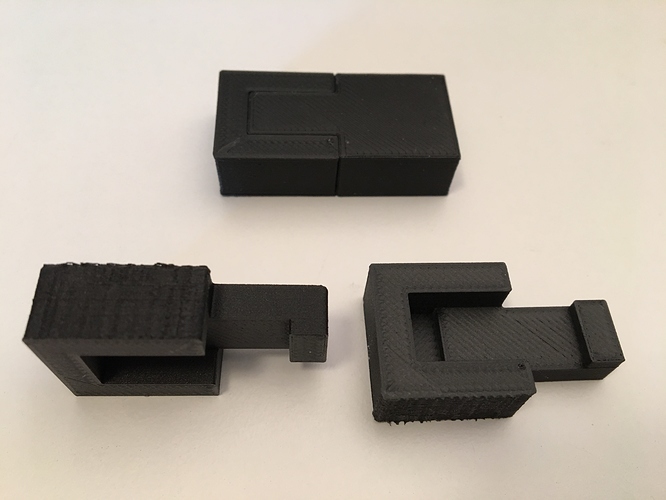
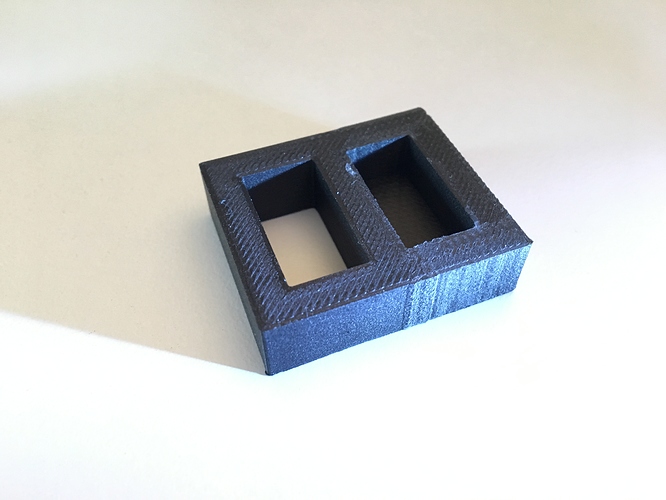
“before & after.jpeg” - i printed the part in the top of the picture on wednesday, 14 Dec. it produced a nice finish on all exterior surfaces. i printed the very same parts using the same onyx spool on sunday, 18 dec. compare the wall quality. (unloaded and sealed the spool between printings)
“half bad - half good.jpeg” - on the same part, the wall is bad on half of the part and normal (good) on the other half. that doesn’t make sense.
Is anyone else experiencing this problem?
connector_test.stl (5.94 KB)
set_-_slider.stl (4.77 KB)
Are these parts printed in a similar place on the build plate?
i would say to try re-slicing the part after the update.
you will need to make a minor change to the part (fiber, infill, brim, etc) but then you can save and change it back and save again.
when the software is updated, the new slicing methods don’t automatically apply to parts that are saved.
worth a try.
I haven’t seen this problem but perhaps try replacing your plastic nozzle. And as Advanced World suggested…reslice the part and give it another try. Also make sure your bed is shim leveled, run the offset tool and laser level the plate. Ed-
Hi shackman0,
My name is David, I’m the head of software at Markforged. Lets see what I can do to help.
The Dec. 17th release didn’t contain any slicer changes (just double checked). We do tons of in house testing before we make and release changes to the slicer and if we see anything like this we won’t release that version of the code. That said, if you want to compare before/after slicer behavior with the same part you can re-generate your build and print that mfp file and then go back to your print history and either export the mfp file or directly send the older print job to the printer. Then you get a 1:1 comparison.
Now, from looking at your pictures the part seems to only have a poor surface finish on one side of it. I can’t tell for sure and without knowing more details about the part (I see you sent a ticket in and I’ll look), but depending on the orientation on the printbed (and if the part contains fiber in it) its possible that your fiber nozzle is too low and is scraping the side of the part when its printing plastic. The fiber nozzle is offset from the plastic nozzle by about 20mm so when I see poor surface finish on some sections of parts its always possible thats the problem. It generally produces the same low quality walls you have (like a rough sawtooth-ish pattern) because as we’re zig-zagging back for plastic the fiber nozzle rubs over the plastic. Have you printed fiber or adjusted the fiber nozzle in between the two prints? The easiest way to tell is (assuming the part doesn’t have fiber in it) if you just raise the fiber nozzle up all the way and reprint the part.
If its not the fiber nozzle height - I’ll follow up on the ticket and we can talk about solution but I’m happy to print it here at Markforged and try to reproduce your results that might be the quickest way to troubleshoot. Happy to investigate and work with you to get this fixed!
- David
Hey All.
Thanks for the great suggestions.
I re-did the bed leveling process, which includes the fiber nozzle gap adjustment, and it’s printing fine again. It was most likely the fiber nozzle as David surmised.
It seems that whenever i start experiencing printing problems, it’s something to do with the bed/nozzle relationship. I need to learn to level the bed as a first attempted remedy for future print problems.
/Floyd