Hey guys,
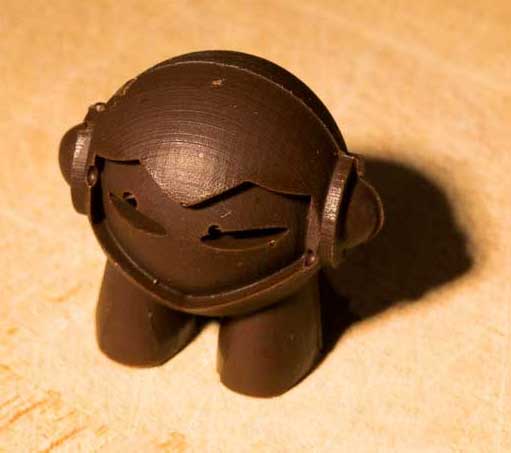
Last weekend I did a chocolate Marvin experiment. Searching for ways to 3D print a chocolate Marvin in Amsterdam ended up in a fruitless adventure. As Albert Heijn (a Dutch supermarket) started with printing chocolate on their cakes, I believed it was possible. Though no printer in Amsterdam/NL was found capable of doing this. Anyone up for the challenge?
There had to be a different way of creating a chocolate Marvin with the use of a 3D printer. Googling and combing out all of the Talk threads I stumbled upon a post of @metaobjects’s Hub. Describing the process of creating a chocolate Marvin with the use of a mould. So, the tutorial:
1: Ask @metaobjects for the .stl of the mould. - Credits for making it -
2: Go on 3D Hubs and search for a high-resolution SLA printer, such as the Form 1+. Or buy/own one, as we do at the office.
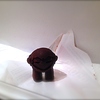
3: Print that awesome .stl and clean it afterwards. Your shape for the mould is now ready.
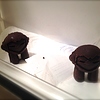
4: Buy some silicone food grade that you can clay or pour over the print. Let it rest for a few hours and take the print out, followed by hardening the mould in the oven for a 2-3 hours on 100 degrees Celcius. (This process depends on the silicone used!)
5: Clean your silicone mould!
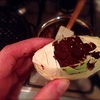
6: Melt your chocolate au bain-marie (some fancy cooking jargon) and poor it with love into the mould.
7: Let it chill in the freezer for a few hours.
8: Take your chocolate Marvin out of the mould and give it the freedom to be consumed.
Let me know what you think of it! Any suggestions for next eatable Marvins? Have fun!
Cheers,
Lars
9 Likes
Luuk
2
Cool stuff Lars! How did they taste? 
1 Like
I find dark chocolate works best and the freezer might be too cold, I leave mine in the fridge overnight 
3 Likes
Yours looks awesome! Unfortunately I was not able to create such a smooth surface and details due to the silicone type I used. Your .stl of Marvin was great though!
I like them, a bit of Cherry for the eye sockets
Now go for crystal type V.
Melt 75% of your chocolate at 45ºC and stir (mix) gently to have an homogeneus temperature and crystallisation.
Add the other 25% and stir until the chocolate cools to 29-30-31ºC (white-milk-dark respectively).
Fill your moulds.
Enjoy!
PS.: It may take several times until you get the good one. And please… Don’t use the freezer!! There is a lot of humidity to ruin your chocolate!
1 Like
Awesome! Thanks for the tips!
bettyb
8
Hi, everyone!
I am trying to print chocolate with Zmorph but it is really hard to adjust proper temperature and texture for chocolate. I have been trying with couverture type. How could you catch the right texture? Which temperature and viscosity is the right one to print an excellent 3D chocolate pieces without spreading? Did you measure the other parameters?
Please share any tips you know!
Hi Betty, we’ve actually been making these chocolate Marvins indirectly; Our process is 3D printed mold template -> Food-grade silicon mold -> Cast chocolate. We’ve never tried FDMing chocolate directly I’m afraid!