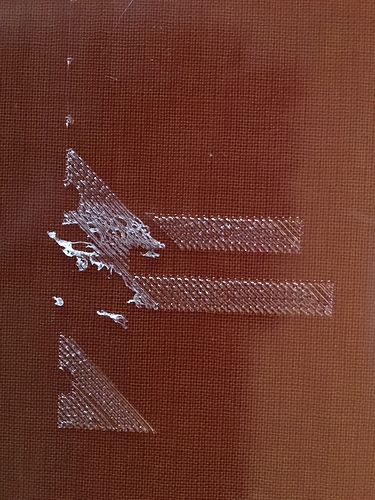
noob. just got my mk2 enterprise. i set up the printer as instructed. trying to print the thingiverse overhang test. i can’t get past the first layer. what do i need to adjust?
its a bit hard to tell from that photo, but I think you should make your Z Gap slightly smaller. The plastic should be pressed onto the bed, so it adheres, rather than dropping out of the nozzle and sitting on top of the bed.
Also make sure you have used a very thin layer of glue on the bed.
1 Like
Aside from bed to nozzle gap what temps are you using? What material?
The Temps are preset on a Mark Two, so if you have changed them, change them back!
Also, it is only designed to work with MarkForged Nylon, so if you are using any other material, switch back to the proper stuff!
The machine and software are very well designed, so it should operate perfectly without the user needing to make change to things like nozzle temp.
Check your bed height to the nozzle, gauges should be in your kit, and always use the glue stick. Once your bed is level you can run the bed level test print to make sure it’s good to go. Also check your nylon extrude with the calibration extrude test. You need a gram scale to weigh the output. Finally, use this site to help you with the rest. https://support.markforged.com 
Obviously make sure the print bed is level and has glue on it. Then I would try running an extrude calibration test from the utilities menu. This will purge a bit of material. If you don’t get a consistent stream during the test, you may want to check the spool in your dry box and make sure it’s not tangled or catching. Also, if your nylon material was exposed to open air for longer than a few minutes (15 tops), there could be moisture in the nylon, which causes build issues. If the materials bubbles or makes popping sounds during extrude test, that’s a sign that nylon is wet.
If the above is true…try cutting off several feet (or more) to remove the water absorbed nylon. Just an FYI…nylon is porous and absorbs moisture quickly, hence why you can dye it colors.
Thanks everyone for your replies. It’s great to see an active community here.
I submitted this problem to support@markforged and got a great email in response. Here’s a description of the problem and its solution.
First off, I’m a software engineer. That means that I follow instructions in excruciating exactness. Computers are unforgiving that way.
The markforged “how to level your bed” website at https://support.markforged.com/hc/en-us/articles/207896386 says
Per the on-screen instructions, loosen each of the three thumbscrews on the bottom of the print bed until the print bed is at its lowest position.
…
Adjust the thumbscrew directly below the nylon nozzle until you can feel slight resistance while sliding the shim.
I received the following instructions from markforged support via email:
… tighten the thumbscrew so that the shim can only be pulled out, but buckles when you try to push it in. Then loosen the thumbscrew to the point where you can now push it and pull it without buckling.
(which, btw, is the exact same procedure i use for my BCN3D Sigma printer for very successful prints.)
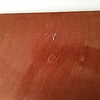
These are two very different sets of instructions. I followed the website instructions perfectly, resulting in poor print quality. I followed these updated instructions perfectly, resulting in a much improved print. see the attachment of the level bed print test.
Problem solved!
Moral of this story: RTFM only works if the M is correct