3/29

Afternoon all. I’ve started trying to print 3d Benchy tugboat as a way to verify print quality on new materials (#3DBenchy - The jolly 3D printing torture-test by CreativeTools.se by CreativeTools - Thingiverse). I started with PLA since its the material I’m “Best” in and the results are humbling.

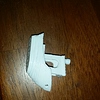
Attached is a photo. Before I even get into if the dimensions are good I have to address the terrible state of benchy’s undercarriage. Any suggestions?

Note: I’ve printed twice at widely different extruder temps with the same results. Bed temp is 70°C, no supports, and fans are off. I am keeping fans off because they tend to warp larger prints beyond usability.

3/30

Ok so added some images that should hopefully clear things up.

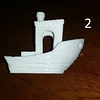
Print 2: benchmark. fans off. no min time per layer. awful but finished.

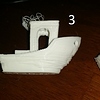
Print 3: fans on after layer 3. no min time per layer. failed before print completion.

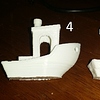
Print 4: fans on after layer 3. min time per layer 1 min. way way better.

So the problem was that the previous layer didn’t have enough time to cool before the next layer came down. Thanks everyone for your help. I’m going to take dimensions on it and post to this thread.

Dimensions Target Actual

Bridge roof length 23 23.05

Chimney roundness - depth 11 11.84

Chimney roundness - OD 7 7.17

Chimney roundness - ID 3 2.07

Horizontal overall-length 60 60.23

Horizontal overall-width 31 31.13

Vertical overall-height - box 15.5 16.06

Vertical overall-height - chimney 48 48.5

Cargo-box size - OAW 12 12.26

Cargo-box size - OAL 10.81 11.07

Cargo-box size - inner width 8 7.58

Cargo-box size - inner length 7 6.75

Cargo-box size - depth 9 9.35

Hawsepipe diameter - thickness 0.3 0.21

Hawsepipe diameter 4 3.7

Bridge front window size - width 10.5 10.2

Bridge front window size - height 9.5 9.33

Bridge rear window size - thickness 0.3 0.26

Bridge rear window size - ID 9 8.6

Bridge rear window size - OD 12 12.09

Dimensional TL:DR: I’m over in the max material condition (maybe over extrusion?) and my height is all sorts of wrong (maybe stepper count issue?). As always any help is appreciated.

3/31

Alright so last night a printed a block that had ledges with widths in increments of 100 mm width, 50, 25, 12.5 and 7 (x axis) and noticed it seemed to nail the 100, 50, and 25 (within 0.05mm) but was terrible on the 12.5 and 7. I checked those against the thickness of the print (5 mm y-axis on every ledge) which routinely came up oversized regardless of ledge width. So my suspicion was that this inaccuracy was related to the perimeter/infill overlap settings in repetier.

Rather than fiddle with that setting I just printed the same block with 0% infill and 0 top layers and the problem went away. All values within 0.05 mm.

Also for the height I noticed top layers with small surface area tended to be raised on the infill. It was always along the edge where the infill met the perimeter. Again with the 0% / 0 print the height discrepancy went away.

I’ll try and calibrate more tonight. I’m hoping by writing all this up I can save some people some headaches in the future.

Hey Hilttech,

I am not used to using PLA, but I know that the temperature of the nozzle must be correct in order for the print to turn out good. 180-200 degrees Celsius usually. Your fans should also be on as it looks like this may cause the dripping look. There are various ways to prevent or lesser the amount of warping, but turning off the fans is not the best solution. Maybe you fans were too cool. I hope someone who has a better knowledge than me can help you out. I wish you good luck with the rest of your prints.

Photo is not that clear, so I’m guessing over extrusion; check your steps per mm value on your E stepper motor

Also looks like layer shifting upon on one axis so check your belts are tight.

There is also this guide complied by simplify 3D which shows some common print problems and solutions

https://www.simplify3d.com/support/print-quality-troubleshooting/#

PLA shouldn’t warp that much upon this print, so keep the fans on but control them I.E only when needed and first 3 layers, it’s bed temp should be 60 degrees C

You might be right. I’ll try turning down the fan speeds tonight.

I’ve traditionally heard between 60~70°C for the bed. I’ll try lowering it as well tonight.

On a tangent though I just got some sitall glass and they recommended 90°C for pla. I haven’t tried it yet but that seems like entirely too much.

Sorry the photo is unclear guys. I’ll take more when I get home tonight. My suspicion is that as the overhang prints it warps up. then the next layer(s) dont print correctly on the overhang because they’re running into the raised portion of the previous layer. So it gunks up (super technical term) on the overhang.

From 3DPrintandStuff’s link it looks like its “Curling or Rough Corners” which is a heating issue. Fans will be on for my next attempt.

Not sure what sitall glass is.

I use 3mm thick standard float glass (window pane) with a coating of PVA glue; Highest bed temp that I have needed is 70° and that was for PETG. PLA glass temperature is 60, also ensure that z height is good and bed is level to obtain good adhesion.

Second this as this reminds me of prints I was getting when I was printing PLA small objects with no fan. The plastic was not having enough time too cool before the next layer came around and hence previous layer would get pulled around by the next layer. Corners would curl up as the previous layer wasn’t cool and solid enough to pull the heat out of the next layer and hold it in place as the head continued on. Currently for small objects I run the cooling fan 100% the whole time on PLA and am getting wonderful prints finally.

I’m running a Replicator Dual clone on aluminum bed with 3M Blue Tape set to 60 deg, 205C extruder (for my particular themocouple, head, and PLA), at .2mm layer height. I also tend to print slower than necessary (~40mm/s) as I find it more forgiving and am not really in any rush.

looking at the output I would adjust the bed temp to 55c not 70. Also PLA print in range of 185 to 215.

That sounds like eithier you are over extruding, or still running too hot for your PLA. Start by printing a 1cm cube at 100% infill. Look at the top of the cube and if it is bulging up it’s over extruding. Dial back the extrusion multiplier till the bulge goes away and you get a slight sinking in the top or you start getting gaps between peremiters then raise the multiplier back to where you had no dip or gaps.

Now check the sides of your cube. If they are straight good, if they bulge, you are too hot. If they are cracked or have gaps you are likely too cool.

It may take a few itterations between temperature a multiplier to dial it in.

I’m at the bottom end of my extruder temp now (180°C) and I did exactly what you suggested. It was over extrusion on the top layer. I dialed it back (now 95%) and its really good. It has also had the knock-on effect of preventing support material that starts on the print (vs starting on the bed) to actually separate from the piece at its base. Its a miracle.