I’m brand new on the 3D printing scene and just got put in charge of my company’s new 3D printer (we basically drew straws…), a MakerBot 2X. We want to see if 3D printing will be useful for us for prototyping/making fixtures before we purchase more printers.
After having a huge number of issues, including a massive, unclearable clog in the thermal tube after only two prints, we got our replacement printer and I’m curious about how to improve the print quality that I’m getting so far. I suspect that the printing temp (230C for each extruder) might be too high, as I’m getting leakage from the idle extruder that gets stuck to the print as the extruder moves over it, but I’m not sure what the minimum printing temp for ABS (MakerBot brand) is. And I’m desperately trying to avoid a clogging situation, which may have resulted from a high temp, like last time.
I’m also getting a sort of rippled pattern on the surface of the print instead of smooth. I recently relieved the bed to give the nozzles a little more distance from the bed, but is this surface texture a sign that they’re still too close? From what I’m seeing when watching the quick test prints I’ve done, this also seems to be a results of the filament leaking and clumping at the nozzle end and getting dragged across the print surface. so I’m not sure moving the nozzle even further from the print bed will help.
Any tips for a first timer would be appreciated!
2 Likes
Do you have a screen shot of your settings?
What settings did you want to see? The print in the picture is a test print that came off the Makerbot’s SD card; I didn’t adjust any print settings from factory defaults. I actually can’t adjust print settings unless I’m working with an original design in the Makerbot Desktop software before it goes to the SD card for printing. I just don’t like what I’m seeing so far with these test prints and am curious what I can change when I do have the option of adjusting the settings.
my company found much better results from the Makerbot Print software, it’s kinda confusing having two different programs available but eventually we all just used makerbot print. There are a lot of cool features about the software (which i’m sure you won’t get into till later) by far the best is the fact that the prints just worked without much to mess around with. Try an original file, originally we just used a 1" square with a hole through it. The goal was to see how accurate the machine was holding tolerances. We were using a Makerbot z18 with very small changes just to perfect what the software was already doing pretty well.
This is good if you are new to 3D printing. It means that you can practice diagnosing problems that you have. From looking at it the print my first thought would be the print speed may be to high. Try doing the print again and you should be able to slow the print down manually on the printer i would try 25% and see how that looks.
When diagnosing a problem you don’t really want to change to many settings at once.
A very important question to ask is if your 2x has all the upgrades put out by Makerbot, can you send some pics of your extruder so I can see. Otherwise, using makerbot print would make things easier. Also, the 5th and 6th gen makerbots do PLA instead of abs but they’re much easier to use. (provided you have an extruder +)
I wanted to use Print instead of Desktop, but it turns out that the 2X isn’t compatible with Print, so there’s not much I can do about that. Personally, I would have preferred we start off with a single extruder printer like the Z18, but I’ve been told the 2X came highly recommended to the higher ups that decided to make the purchase.
do not use the test files to gauge your quality. The test files nearly work as they stand. Open MB desktop and upload your own small model with default settings and go from there. 230c is okay ABS do not go above 240.
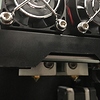
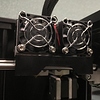
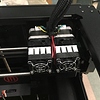
I’m attaching a few different views of the dual extruder head. It’s not the extruder +, but given that we got this just last week, this is the most updated model of the 2X available for purchase.
I’ve been reading that 230C is within range for ABS, but is the filament leak from the nozzle head during preheat a sign that I should drop it a bit?
Yep, that looks good, you can remove the tubes and blow compressed air down the hole to clear any ground plastic, then I would say slow it down a little.
do
60mm/s shell printing
80mm/s infill
60mm/s first layer
Also, make sure to relevel!
The 2x is compatible with Makerbot print but only using a SD card, if your not printing from a SD card you should be.
Thanks for the info about makerbot print. I’ve been using the SD card this whole time, but support (who have really been on my nerves throughout the whole troubleshooting process with the first printer) told me Print wouldn’t be compatible regardless.
I’ve been playing with the leveling (specifically not letting the nozzle get too close to the print bed) and will try it again and see if that helps with the surface quality. How often would you say I should relevel? Between every print?
When I’ve got time later, I’m going to make a quick little test print and try slowing the print speed, as well. I’m just a bit worried that, because there is filament leaking and clumping in whichever nozzle is idle during printing, that these clumps might harden and make worse drags during the print.
1. Have a look here:
https://support.makerbot.com/learn/makerbot-print-software/release-notes/makerbot-print-release-notes\_13553
The downside is that makerbot print doesn’t support both nozzles as far as I know.
2. Does the filament leak out of the nozzle or between the nozzle and the heat-block?
3. Look at this video of leveling:
and also this video for leveling between nozzles:
Usually if it’s making blobs while printing then your nozzle is to far away from the bed…
Filament will almost always leak when at rest, you can drop the temp and see how it reacts but a little oozing filament is pretty much normal operation.
Bearing in mind that the 2X has a hood, making it a fully enclosed heated environment.
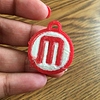
It’s not as much a big deal during preheat as it is during the actual print. The idle nozzle almost always has leaking filament that tends to clump and drag across the print surface with the nozzle (you can kind of see the drag marks on the coin).
1. I know that some of the prints we’re going to require will need dual extrusion, so I guess I’ll just stick with Makerbot Desktop.
2. It’s leaking out of the nozzle, not near the heat block. And the leaking happens with the IDLE nozzle, the one that shouldn’t be extruding any filament while the other nozzle extrudes. That’s when the resulting clumps drag across the print (getting stuck in it) and become a problem.
3. I’ll definitely relevel. I felt like it was pretty well leveled for the most recent test print, but it can’t hurt to try again. My tendency is too level with the nozzle too close to the printbed, so that’s what I’m usually wary of.
It’s normal to leak a little during heat up but generally it should go straight down, if your level is good the string or blob will come off when the print makes that initial priming line to get things started.
so what we’ve established so far:
1. Properly level the bed
2. Properly level the extruders between each other.
3. Maybe sllow it down a little.
other thoughts:
4. Make sure your filament hasn’t absorbed any moisture:
https://www.matterhackers.com/news/filament-and-water
5. Consider ordering PETG from micro center, PET is a filiment with the strength charitoristics of abs but the print characteristics of pla. For your purposes it can be considered a direct replacement, I have a 2x and 2 5th gen printers and 1 6th gen printer and I love PET!
1 Like
I used some foam as a dust filter for the filament, but hadn’t even thought about humidity effects. I’ll unload and store it in a drawer or something when not printing, probably with some desiccant for good measure. Thanks so much for your advice : )
First question (not a criticism): Was there a reason that the company chose the MB 2X? Unless ABS plastic was a requirement, it is in most cases, best to start with a PLA printer. There are arguments to this topic, but using a PLA printer is easier, especially if your are new to 3D.
The X in the 2X denotes Experimental. It’s best to consider it permanently as a “Beta” release of MB’s dual extrusion machine; and purposely so. ABS is more susceptible to ambient conditions, slicing programming, tolerances…stuff. It’s a tinkerer’s printer for those with some experience,interest and time to Experiment. I work with groups new to 3D and I, and my fellow volunteers, always recommend a single extruder PLA machine.
As noted in other comments (I may be repeating advice of others, sorry) make sure you have the latest firmware update.
Makerbot has a new desktop for slicing: Makerbot Print. But, I would recommend firmly that you use the original Makerbot Desktop for the 2X. It’s tried and true and is hand-and-glove with the Replicator 2 through Replicator 5th Gens. Run through set up again. When setting nozzle height, the friction created using the piece of paper as the measurement should be SLIGHT. Too tight and your just making the nozzles plow through the paper, essentially in a furrow.
Keep us updated:)