Thanks to everyone who responded to my first thread. I believe I fixed the problem (the problem was excessive banding, and poor print quality). But now I’ve run into another one. I’ll explain.
I went through the setup and creation of printer profiles on Slic3r. I followed the instructions on this video:
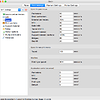
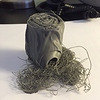
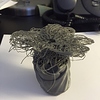
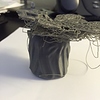
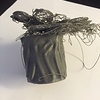
It was a huge help. I readjusted the settings to create a beautiful print. The problem was, the print was only beautiful in the middle. The first few layers looked a bit suspect. And then, probably about 80% through, the print just went crazy and turned into the model you see in the attached photos.
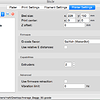
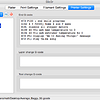
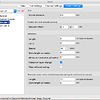
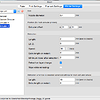
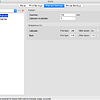
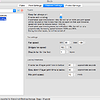
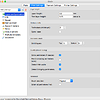
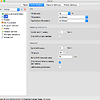
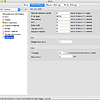
I’ve attached as many photos as I can think of, showing my settings for slicing, etc. I’ve also uploaded them here, just in case you can’t open them:
https://app.box.com/s/1ic8mgze7q5uu55f60wtigf4tw3hvj1o
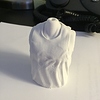
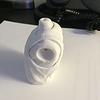
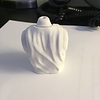
Hopefully those will help in determining this most recent problem. I’ve also attached photos of what the completed model SHOULD look like.
Again, I used the Slic3r program to slice, with custom gcode, then exported to x3g via GPX. Everything seemed to work great. Like I said, I was REALLY impressed with the quality of the part of print that printed smoothly - it’s even smoother than the MakerBot, and even lacks some of the divots and minor flaws that have been produced consistently over several prints.
I’m really not sure what to make of the problem. As I said, the print was going BEAUTIFULLY. It started off badly, which had me concerned (and still does), but then became very good. Then, at the end, it was a disaster.
Any help you can offer would be GREATLY appreciated.
Thank you, all!
-matt
4 Likes
Could be mechanical issue, maybe try oiling and greasing rods and z screw and then tightening the lock it’s on the axis. Could be the belts slipping
eckerj
3
Hi Matt,
It’s kind of hard to see what the problem is by the photos. Which one is the bottom? It looks like the print started too far from the build plate (z offset) and/or the part was knocked off the build plate.
Try printing a couple short cubes/rectangles to see how good your bed adhesion is. You might consider adding in a 5+mm “brim” to help keep the part stuck to the bed.
That has happened with my FF a couple of times. The culprit for it was two different things.
First time, I was using cheap filament that had a large bump in one section of it (was not uniform), and so it stuck for about a layer, because of this, the next layer didn’t stick, and it caused this problem.
The second time, there was build up on the extruder gears, and it did the same thing, slipped just long enough to print one “blank” layer, so the next layer didn’t stick correctly.
Hope this helps.
Hey,
Thank you for your response!
I used the filament that came with the machine - was the the same kind that gave you trouble? And, where do you recommend getting filament from so I don’t run into that issue?
Also, how do I prevent a buildup in the extruder gears? I’m very new to 3D printing - I know what the extruder is, obviously, but I’m not sure how to go about maintaining it.
Again, thank you for your help!
matt
Hey,
Thank you for your reply! I appreciate it.
The top of the model is the side with the crazy mess. As I said, the print got about 75-80% finished, then just went crazy and started printing all over the place.
The bottom started out a little suspect as well. The first few layers didn’t appear to be sticking to the bed, but I figured that was because I’d just configured all of the print settings differently, and it was normal.
What does the brim do, exactly? Sorry if that’s a dumb question, I’m relatively new to 3D printing.
Thanks again!
matt
Hey,
Thank you for your reply!
Since I’m relatively new to 3D printing, I’m unsure of what the z-screw is. Would you be able to explain that to me? I’ll give it a shot.
Also, is there a way to fix the belts without damaging them?
As I said, I’m new to this, so I apologize if these are dumb / annoying questions. I just don’t want to risk breaking something on the printer.
I appreciate your help.
matt
The filament that came with it is fine. The garbage filament that gave me trouble was SHAXON filament from FRYS (I would recommend NEVER using it).
No way to prevent buildup (though it has only happened twice for me, once right after I got the printer, and the other about 400 prints later). But to fix it, you can just take the screws out of the fan on the extruder, remove the heat sink, and use a pick to remove pla and abs gunk from the teeth on the gears.
I can also add that the printer was on a wooden table when this occurred. The table itself isn’t “wobbly” to the point that it’s in danger of falling over, or anything, but I have noticed it moving back and forth from time to time with the printer momentum. Would that be an issue? Should I move the printer to a concrete floor, or something more sturdy?
Thanks again for all your help!
matt
eckerj
10
I haven’t used Slic3r in quite a while, but you should be able to preview the output after configuring a “brim”. It basically adds concentric, attached outline-rings to the very first layer of your print.
What did you prepare your print surface with? Did you use painters tape, gluestick? or just print straight on the clapton tape?
The z screw is the big screw running up the rear of the machine with a motor at the base. The set screws will be on either end of the belts and attached to the motors. I would just loosen and tighten those to make sure no slipping is occurring. What’s being Said isn’t the other post is that the feeder is grinding through filament creating a buildup on the gear hence creating under extrusion. But a single layer of under extrusion shouldn’t be doing this. I would try software like simplify 3D also if you can afford it. Works a charm on my flashforge and ultimakers
I just used the attached coating. I guess that’s the clapton tape?
I’ve read that you can use painters tape, brushed with a thin layer of acetone and dissolved filament. Ever heard of that? If not, what would you suggest? I never imagined “gluestick”. Won’t that ruin the surface?
Thanks!
matt
I’ll have to give that a try.
What does “preview the output” mean, exactly? Is that a digital preview of what the finished model will look like?
eckerj
15
I know it may sound boring, but my advice would be for you to start simple. Try getting some 20x20x10 calibration cubes printing nicely before moving on to more complicated, longer-running prints…
As reported on the 3D Hubs weekly and other places, the troubleshooting guide recently published by Simplify3D is an awesome place to start:
https://www.simplify3d.com/support/print-quality-troubleshooting
It shouldn’t, but with the filament that came with the printer, it does happen. That filament is ok, but doesn’t bond well in the first place.
Alright, cool. I’ll give that a try.
This is the second print I’ve done so far - any idea how it would become clogged so quickly?
Thanks for your help!
Oh, wow…I didn’t know this type of guide even existed. That’s a huge help.
Are the 20 x 20 x 10 cubes the pre-loaded x3g files that come with the printer (along with the traffic cone)? If not, do I have to download them from somewhere?
Thanks again for the help.
Painters tape will do you good. without anything except maybe some glue stick.
I have a borosilicate glass plate on top of the print beds of all 3 of my FF printers, and use ONLY gluestick for my prints, with great results.
Before I got the glass plates, I used blue painters tape, and a thin layer of gluestick, with good results as well.
It can easily happen if your extruder temp is a little too low. In that case, the filament doesn’t melt fast enough, and the filament slips on the gears occasionally, shaving off a little bit of the filament each time.

")