Hi,
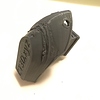
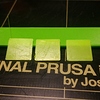
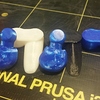
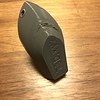
I have a small Problem with my 3D prints. In the photos you can se in the front the overlapping layers does anyone know what the problem is and how to solve it ?0 It happens only with ABS and HT filament, PLA and Bronze filament are working perfectly fine.
It would realy help me out a lot
2 Likes
Looks like a cooling issue, how much cooling do you use?
AlexG
3
Heyo fruitbear! I just got my Prusa i3 MK2 and although I have never ran HT filament through it, I have had prints look like this in the past with my Ultimaker 2. I can certainly attest to the fact that this problem looks like classic over-extrusion! Because PLA and Bronze filament are similar in temperature range but Colorfabb HT and ABS are on the higher end of the spectrum (Colorfabb HT=HighTemp) they may cause some over-extrusion and warped layers. My suggestion would be to try lowering your nozzle temp or maybe increasing your fan speed. Another thing that you could try, but I wouldn’t reccomend to try right away would be to lower your extrusion multiplier.
Please let me know if you have any other questions I am happy to help you out here!
-Alex
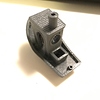
With all respect I dont think his bottom layer or the top part of the boat would look like it does if the issues he have on the front of the boat is because of over extrusion?
Although PLA and Bronzefill (PLA based) handles overhangs a lot better than Colorfabb HT does (I’ve printed a few kilos with it), and I think the issue you can see here has to do with cooling for sure, which is kind of a difficult thing with HT since you want pretty low cooling for layer bonding, but need more cooling for overhangs and bridges.
Fruitbear, what slicer have you used?
I would try increase the Cooling some, leave the extrusion multiplier for now as Alex mentioning (if you haven’t calibrated your steps/mm, do that first as well, before you start to guess, following Tom’s guide for example: 3D printing guides - Calibrating your extruder - YouTube) since you will never learn if you start change more parameters than one at a time.
AlexG
5
Yeah I agree with you saying its a cooling issue, but assuming he has his fans running at 100% thats why i recommended maybe printing the HT/ABS at a lower temp if possible because near the thickest part of the boat is where the most heat is accumulating, and im not so sure fans can be run at over 100% (never tried it) printing faster may also help that way you don’t let the heat sit in that area for too long. Finally, I would also recommend PID tuning your hot end as the temp could have drifted very high and caused this problem. PID tuning is pretty easy and straight forward. It has made my prints exceptionally better!
https://www.youtube.com/watch?v=4NlPzp05VwY
I would assume that he prints with a lower fan speed like 30% since that’s what recommended for Colorfabb HT
100% on colorfabb HT will most likely result in layer splitting during print (depending on geometry of the model).
1 Like
Hello Fabian,
I do not have experience with that kind of filament, I actually use cheaper local material but it looks like you temperature is too high causing the material to melt too much as well as not sticking properly to the bed.
ABS would usually require 250C not more, you did not mention the properties you made the above but the strings your getting all over can identify that.
Along with that I can tell you’re bed is not hot enough thus your bottom layer is not flat.
Three factors effect the bottom layer and the whole process along with that that could also benefit your print quality that looks like they do.
1. Bed temp, if not hot enough (can probably use 90-100C easy).
2. Z height, use the Z height adjustment from the Prusa menu and make sure the gap is as much as a paper thickness, not more. A good way to inspect it is when you use the Prusa Slicer it draws a line prior each print in the from of the machine, the line should be like in the manual you got with the printer, sunk but not grooved.
3. probably most important, reduce the first layer speed, assuming yo are using the Prusa Slicer predefined params, reduce the first layer speed to between 20-40% small areas can use 60% as set, bigger areas 40% and big areas 20%.
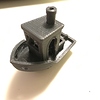
You know your first layer is good once it is flat and all you can see is lines of the filament previously drawn, if it looks like your ship it is not good, as you can see there are gaps between the filament lines and your adhesion to the bed is not good.
I had that problem a while ago and once understood the first layer issue, all my problems were over
Hi
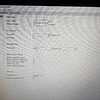
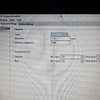
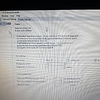
Thank you all for the fast reply. I`m using Slic3r for my 3D Prints.
The settings in the pictures, where used in this Print. I`m going to try lowering the Temperature to 260° and use the fan with a fan with 30% through the hole print. Or is there a better suggestion ?
I would start with adding 30% fan after the two-three first layers, 50% fan speed for bridges, and leave the temp.
If you lower the temperature as well, and you get a good result, you don’t know if its the lower temp or the fan that made a difference. I’m always editing one parameter at a time.
1 Like
Looks to be curling from too much heat build up. Drop temp by 5 degrees and try again.
Hi Fabian,
I must be using a little older ver. of the Slicer as some of the params I do not know.
I also use 0.2 mm for standard prints which is completely satisfying, not need to go down to 0.15, could be a result of your setting…
I’d start with adjusting the first layer until it looks like in the pic I attached should be like the left one or better smoother, yours is not even like the right one, which I define as bad adjusment.
See my prev e-mail regarding the points to check / change and once you are there, drop the temp to 260 and try again.
Take just any print and stop after 3 layer to check what it looks like until you get there.
Let me know how it works for you.
BTW, I never had to change the fan setting, as there are they seem to be just fine.
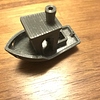
Also attached is a print done with 0.2 mm just for reference…This is a support test pic taken from bottom side and you can see the first layer and the diagonal is printed on support, see the quality of the right blue part
1 Like
Hey
I solved the problem with the bottom layer. I adjustet the Z axis new and it wortked out. I will know drop the temperature so the stringing is not that bad and the overflow stops at overhangs.
i hope it works.
Thanks for the support