If you haven’t heard of the Curta Calculator, see the wikipedia page for basic information and the vcalc.net disassembly for a look at the internals of one.
I have read numerous times that it could not be done and when I took on the project I was also told numerous times it could not be done. However, that hasn’t stopped me. I have been working on 3D printing a Curta Calculator for some time now (It crossed the year mark on April 5th, though much of that time has been spent in planning – significant printing started this January). I am printing it at 3:1 scale and most of the printing is being done on a gMax 1.5 customized with an e3d chimera hotend. I have one standard 0.4mm nozzle and one 0.25mm nozzle for the smaller parts (absolutely necessary at 3:1 scale). The modeling was all done by myself based on the original engineering drawings. The project has been moving a lot more lately and I wanted to post about it to increase visibility to the project.
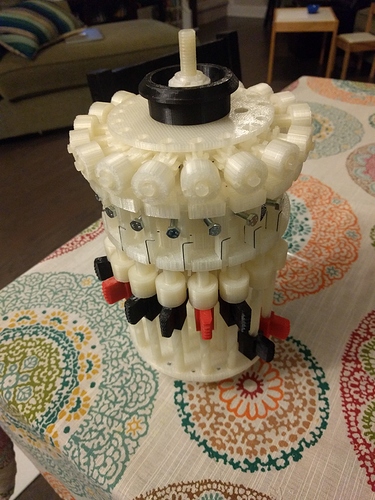
This is the latest as of 5/9/2016. I’ve been working on the top portion where results are tabulated. Each of the dials around the top will display one digit of the result. The black collar at the top is threaded and was my first attempt at printing thread (before I had printed the part and cut the thread into it using a tap and die set). The thread turned out well, but I had to trim it with a file some. Next time I’ll give more tolerance.
I have the bottom portion of the Curta fully functional. That is where all the mechanics for the math and carry operations are located. I am currently working on printing and assembling out the top portion which is where the mechanics of the bottom portion produce a result that can be read. I’ve been keeping progress on the project in my blog and the following is a list of my posts about the Curta:
-
Part I – Beginning the CAD modeling (in OnShape)
-
Part II – Completing the CAD modeling and beginning planning (I initially thought I would try SLS)
-
Part III – Estimating 3D printing tolerances for various mechanical fits
-
Part IV – Initial 1:1 scale trial with Shapeways and decision to go back to FDM
-
Part V – First test prints of Curta parts; first working part (not going to be used in the final Curta, though)
-
Part VI – My first real prints and experience cleaning support material off of large overhanging parts
-
Part VII – More printing, assembly of the main frame, adding threads to printed parts, making springs.
-
Part VIII – Finished the bottom portion of the Curta… and then broke the main shaft.
I also have a few videos up on my youtube channel.
Currently I am working on completing the Curta by printing the upper results portion of the device at which point I will post a ninth entry to my blog. The plan is to then write a tenth post about finishing it with the numbering, lettering, and coloring (it’s honestly not very useful without at least the numbering).
Through the process I have learned a ton and I’ve also managed to find two others working on building Curtas – one who is also intending to 3D print one and another who is planning to machine one. Neither are as far along as I am.
The biggest headaches have been:
- Trying to figure out how to accomplish certain aspects of the build with a 3D printer. Things like making the tolerances tight enough (the engineering drawings call for tolerances in thousandths of a millimeter in some places), tweaking support structures in Simplify 3D (I have kept the design mostly the same rather than modify it to eliminate the need for supports – in fact in some places I have combined parts I would have been able to print individually without supports. Simplify 3D makes life much easier, but getting the settings right is still paramount)
- Breaking parts during assembly and having to reprint sometimes large parts
- Printing a batch of parts only to find out that the engineering drawings were wrong, having to figure out how they were wrong, modify the models, and reprint. So far there have been three parts this has happened on. One was the main shaft, one was the selector shafts (for selecting the value of each digit of input), and one was a stopper sleeve for the reversing lever (the reversing lever determines whether a subtraction operation should add or subtract from the turns counter which indicates the number of times the input digits have been added to the output).
I will update this post as I publish more blog entries. Please feel free to ask questions.
3 Likes
Amazing work. How is the project progressing? Will you be making the 3D models available publicly? re:3D would be happy to contribute to the project.
1 Like
Marvelous ! Thanks for sharing your design. I was told Curtas are too complicated and genius for being replicated as well long time ago. Really glad that a genius like you did it.