Cinter
1
Hello Community,
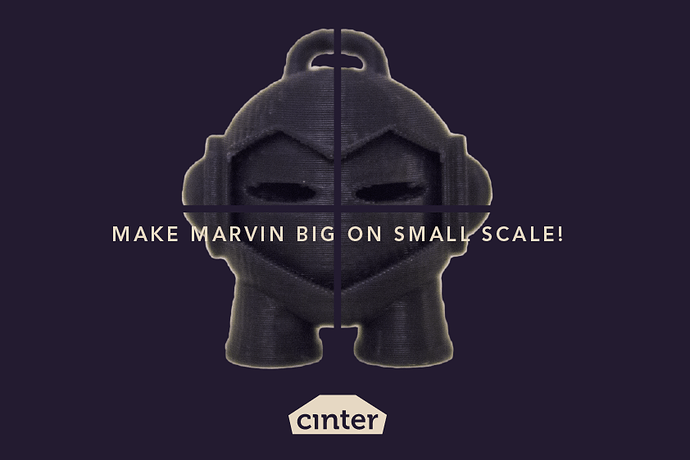
So we have you a little challenge and/or a polite question! How do you make big things with a standard size desktop printer e.g. Makerbot Replicator 2 or an Ultimaker 2?
Like us, you may chop it up like quartered Marvin below but then how do you stick it back together? What would you do if each quarter was dimensioned to fill the maximum bed size? Do you feel sometimes constrained and/or limited to your build envelope when printing and making designs?
We have often wondered if there is a solution that could make the task of joining simple, harmless, easy to do and provide a clean and barely distinguishable seam. Let us know your stories and your challenges as we in-turn want to make this easier for everyone.
Look forward to hearing all of your views and maker stories.
Kindest regards,
The London Mayor’s office
Cinter
6 Likes
I used screw threads on a build of a (soon to be updated) lightsaber as it was way too tall for my printer. As long as you leave a gap accounting for the .4mm nozzel size (.4mm gap, I used .3mm on this for…no reason…it worked anyway) you can do screw threads this small Luke Skywalkers Lightsaber (Return of the Jedi) - UPDATED: MARK II by james___uk - Thingiverse
1 Like
Seams be damned… we had a group build in Massachusetts where we went for fast and dirty. http://www.create1.biz/3djack
2 Likes
For parts made in sections, I often add a positive and negative feature (like a bump and cavity) on the mating parts. Great for alignment. Or, add 2 cavities and then insert a dowel pin for alignment.
Seams can be made cleaner be assuring the edges are sharp and maybe even a little longer so they can be sanded once assembled.
1 Like
A little while back I documented how I divide models into different parts in Blender. The advantage to using blender is I can create holes for pegs that I use to peg them together which I’ve done at times, but mostly I don’t worry about it because with a little glue things tend to line up well enough.
3 Likes
Priit
7
I have printed parts over 80 cm long with my Makerbot 2X (works only with ABS I think). I print them in many little pieces, sand them properly and make a thick mix of ABS and acetone. Then I add the pieces with some Loctite and cover the cracks with the ABS-acetone mix. I let it dry and then sand of the excess plastic and cover a light layer of ABS-acetone mix on the whole model. Then I use acetone vaporing and after that I colour the model. Good and strong solution in my opinion.
A good example of one of the prints (sunglasses for comparison): http://postimg.org/image/hsol7qwrj/
1 Like
I think what you are looking for are ‘keys’. Essentially, they allow you to easily reconnect parts after a plane cut or something similar. Bold Machines has a pretty solid tutorial for printing their movie characters, although they dont go over much detail for the software process. Hot glue is apparantly useful also 
1 Like
With ABS part I use “same stuff” or Ambroid “ProWeld” to fuse surfaces together. Keying if necessary. I got that tip from a tour of Stratasys back in the mid 90’s
1 Like
Gary
10
The software 3D-COAT has a feature that will split an .stl, and automatically add in alignment pegs and holes.
2 Likes
Yup. That’s more-or-less the process I use. I wet the mating surfaces with Acetone before I stick em together with ABS/Acetone slurry though, just to soften the surface and ensure the dry surface doesn’t absorb the Acetone out of the slurry to quickly. A good sanding afterwards finishes the job. Spot the joint…
Cheers!
AndyL
Pot8oSh3D
1 Like
Cinter
12
Fantastic responses, keep them coming!!  ‘Keys’ seem like a great idea particularly for alignment. Some of the techniques still sound a bit messy and dare I say it not very user friendly. Is anyone out there trying chemical free solutions?
Cinter
13
@Gary we will definitely be trying out this software, thank you and it’s free (seems too good to be true).
Cinter
14
@ST3P_GLASGOW This project is great! A really useful and helpful post too. Are you able to tack the parts together before fully attaching and would this be of benefit to the process if you don’t?
I have built around 6 large scale models that have been larger than my build plate. One project had 212 parts!
Many different ways to do this.
Pegs are awesome
Allow holes to run through center of parts to insert metal rod or PVC pipe. Make it like a shish kebab
Weld edges together with soldering iron
Friction welding with dremil and old filament.
Bondo
or xtc 3d
2 Likes
This is a great post, thank you.
We had a similar experience but with another 3D printer. The task was to print a full scale large UAV (150cm*200cm) using a printer with a small build envelope.
We sliced it up using CATIA, then glued the pieces with superglue and a gap filler, then sanded it and painted it. It turned out pretty well.
Picture: https://igcdn-photos-e-a.akamaihd.net/hphotos-ak-xaf1/t51.2885-15/10848447\_1646891178871916\_787689164\_n.jpg
1 Like
we’d definitely be interested in keys, but skeptical about the fit due to shrinkage. If there’s some way of adding keys with consideration for shrinkage, we’d love to find out more about it!
1 Like
I bought the 3D Doodler pen for just this reason, when i have curling at the edge surfaces, I will glue the pieces together and where I have gaps, I will plastic weld the two pieces together to create a smooth surface.
3 Likes
Does this software account for FDM printers hole shrinkage because if I have models that need connector? As a way to combat this issue without an automatic solution I will model the part and offset the hole by .0125" to adjust for printer tolerance.
“…, thank you and it’s free (seems too good to be true)”
it really is? I just find a limited trial for free, did I miss something?
1 Like