I am building my own 3d printer from scratch, I have already bought a few parts. If anyone has any suggestions, or warnings let me know. I have access to a makerbot 2x, and lulzbot taz 5 for printing various parts. My biggest concern will be the extruder to work properly, and the programming. Thanks
1 Like
ProDonk
2
Care to elaborate?
What parts do you have already / What sort of a printer are you going to make / What will the size be / etc. etc.
Try to be as detailed as possible so we can help you further 
1 Like
Domsk
3
It doesn’t have to be perfect the first time since you are going to optimize it anyways. It’s difficult to give you an advice without knowing your plans. For example I choosed to combine the X and Y axis because I wanted the print bed to just move up and down. It works, but my construction is not rigid enough so I have vibrations all around.
1 Like
Mirth
4
Programming isn’t an issue. If you need help let me know, I can configure Marlin for you and send it over. I’ve designed 3 printers and built one. The other is for a company that is hoping to sell some units in the future and the third became unnecessary. Extruder is easily calibrated theoretically then more so by using Tom Sanladerer’s YouTube guide.
As far as design tips go… really depends on what type you’re designing. But in the end wire management has to be a huge one to consider. If you’re designing a CoreXY then put the X endstop on the carriage itself, this saves wiring to the runner units.
If you want any help designing it or the parts necessary let me know, I’ve done commission CAD work before and have experience with printer design.
This link will take you to my YouTube channel where I’m documenting my CoreXY developments. The design was rushed so I’m evolving it as I go, but perhaps you can learn something from it: http://www.youtube.com/user/AcrimoniousMirth
Hope this helps! Like I said, contact me if you need any help 
1 Like
As for the style, I’m thinking about making it similar to a lulzbot, where the bed moves on the Y axis an the printer head moves both X and Z axis.
1 Like
Parts I have now…
1. OSOYOO 3D Printer Kit and endstops
2. 5 nema17 stepper motors
3. 8 500mm x 8mm chrome plated rods
3. 2 400mm x 8mm screw rods
4. Various 8mm bearings, pully’s, and belts
For the extruder I plan on making most of it from scratch, and the hotend, probably just going to buy something and make it work. not sure if I want to have the extruder attached to the printer head, or mounted to the side of the printer and run a tube for the filament to the hotend.
Printable area?? Hoping to get about 40cmW x 40cmD x 30cmH
1 Like
Mirth
7
Chrome plated rods aren’t recommended. You want something with a good hardness, the best being silver steel. This is much more important as the amount of wear will be much greater than the oxidisation, especially with constant grease treatment from the bearings… Also, for lengths around 500mm+ you’d be better off with 10mm rods.
Direct drive is better than Bowden (remote extruder on frame) in my opinion! But its just opinion and varies from person to person.
Also, if you manage to get that print area I’d like to see! You’re going to have a pretty big frame and may have to make your own heated bed if you plan on any large prints, even for PLA.
1 Like
Mirth
8
This is a good base for an easy design. Just be careful about the rigidity of your bed system, especially with such a large one. Oscillations from motion and springs can lead to decreased print quality and odd edges.
1 Like
I’m just hoping to get it to work for now, I’ve been thinking about using aluminum rods with brass bushings… that was it’s lighter, and less resistance and wear. But as you pointed out, I’m not sure if that would work since the roads are so long. Also, using the direct drive would make the printer head lighter as well, so I’m hoping that will also reduce wear on the rods.
1 Like
Mirth
10
Here you mean Bowden drive. Direct drive refers to extruder directly above hot end. Bowden/remote refers to it at a remote location (its called Bowden after the Bowden principle of motion transfer by filament through constraining sheath).
I know the feeling! Look forward to lots of testing and calibrating, my machine prints but I’m still tinkering with getting the temperatures just right, and like you say, its an ongoing process! I already have a lot of upgrades lined up for mine.
The aluminium and brass may be a good idea, though my worry would be the increased friction, even with good lubrication. Could use IGUS bearings.
1 Like
Do you think there would be more issues with the Bowden drive? or does the Direct drive just function better?
And for the end stops, where do they need to be located? where the printer head is at 0,0,0?
1 Like
Mirth
12
Bowden drives take a lot more setup (especially for calibrating retraction) because the effect on the filament is delayed and can be especially troublesome for flexible filaments. The one distinct advantage of Bowden is that it takes mass off the carriage. However if you’re printing 1.75mm (as most do) you don’t need much torque (13Ncm is guideline minimum) so you can use small motors and reduce mass anyway. Personally I’m a direct drive kind of guy.
End stops… Always at origin (0,0,0,). You can have others at the extreme opposite corner but origin endstops are a must because the origin is where all your coordinates are measured in relation to, it is the datum point. You’re much less likely to get incorrect/ slightly wrong coordinates when using origin endstops than max endstops. If you use max for homing, you have to know exactly the distance between origin and max point.
So, min is best
1 Like
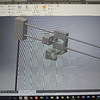
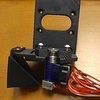
I have finally started the design process… The parts on the Y-axis attaching to the printer head rails are temporary, just put them there for visual representation. Sill working on the rest of the extruder. Just figured I’d give you guys an update and hear your thoughts.