Falco3d
1
he guys,
I just bought am Ultimaker 2+, which i’m very happy about, but if been wondering into printing movable parts assembled in one run. I couldn,t find anything usefull of how to do this without SLS of dissolving materials, sorry if i’m wrong.
This is where i get stuck; Can i just create a simple joint that has 0,5mm space in between parts of does dit get jammed, what resolution,infill, speed, cooling etc…
Tips about materials and printer settings are also very welcome.
4 Likes
Cura’s raft setting is 0.15mm, and im betting you know how easy or hard it is to seperate the raft from the model, also think of the support material XY seperation (default 0.7mm), it will be trial and error for you, but there are models that are small and easy to help calibrate “print in place” designs: Gear Bearing by emmett - Thingiverse
Good Luck.
4 Likes
I have printed once the elephant from the link below. His legs can be moved after printing, this worked real good. Maybe you can copy the size of the gaps from this design. https://www.youmagine.com/designs/elephant-fabshop
I have printed once the elephant from the link below. His legs can be moved after printing, this worked real good. Maybe you can copy the size of the gaps from this design. https://www.youmagine.com/designs/elephant-fabshop
venkel
5
Clearance between parts is very dependant on design an orientation. Sometimes 0,4mm works for horizontal separation but for joints with overhang it might be impossible to get them moving.
I have done this for relatively simple hinges but it can be done for more complex designs as well. The key is a very well dialed in printer and a design that builds in the appropriate clearances. If you go to Thingiverse and search for moveable you will see a lot of examples…some very good. I would recommend starting small…design a simple hinge. Print, tune, repeat!
You will get a lot of varying responses on this one, so take mine with a grain of salt. I would suggest printing with a 250 micron (0.25 mm) nozzle and have your slicer generate supports in the area that needs this gap. Lighter density support material tends to come out more easily but it will leave an uglier finish above and below the support material. The desired density of the support material will depend on the size of your part. Another good tip, if your slicer allows for it is increase your print speed above gaps. This gets better bridging, but you will have to tweak it to get it just right.
Good advice on the 250 micron nozzle as it will print a more precise part…at the expense of time of course. If you did not get your machine while the Olson block offer was running you should look into an upgrade. “Life changing upgrade in my opinion”. While you are spending money take a look at Simplify 3D. It has great support functionality including the ability to manually fine tune where you put supports…which in my opinion is invaluable.
I couldn’t agree more about Simplify3D. On the other hand, the Ultimaker 2+ has adopted the interchangeable nozzle sizes.
gr5org
10
If you want a safe hinge - cone shaped hinges work well because the max overhang is 45 degrees (or you can make the slope even more gradual but then the hinge has more slop. Imagine a cone and then a hole for a cone that fit inside each other with maybe a .2mm gap between. Also on thingiverse search for “gear bearing”. The first one by emmet prints in place on a UM2 nicely although you have to print with no brim and the bottom layer can’t be squished too much. But I’ve had that bearing come off the glass and it spun freely immediately. So it can be done but it’s a challenge.
1 Like
Falco3d
11
I will be testing some basic hinges and joints today thanks for the advice
tyscof
12
Yea they should work fine, all the the jointed stuff on thingiverse prints out great for me. You should make sure your rafts and stuff come off very easily because if they don’t you need to tweet your filament or printer settings. Mine comes off with just a little tug. One thing that I noticed made knight and day difference is the quality of filament it truly makes the experience 100x better. I print with 60 dollar a roll abs and things are pretty great. Good luck
PLA is the easiest material to print if you are starting to 3D Printing, about printer settings, you should try to print a piece with different settings using your 0.4 mm and 0.2 mm nozzles (for example: layer height 0.25 mm, 0.1 mm and 0.06 mm), about infill 20% to 30% is always pretty good unless you are printing a piece with mechanical movements. Speed: try using 40 to 60 mm/s, Cooling: depends on material, PLA uses 100% cooling, CPE and ABS try avoid any cooling and print in a room with temperature about 23 to 25 degrees Celcius. Hope you do great. Regards.
gr5org
14
>Speed: try using 40 to 60 mm/s,
The UM2+ has very high acceleration compared to most printers so 40mm/sec on the UM2 for a part less than 2 inches across is probably about the same as 100mm/sec on a typical printer. For printing long straight lines like printing a large cube the speeds are almost identical. But anyway you will get amazingly better quality if you slow it down to 35mm/sec on the UM2 series printers. It all depends on if you want beauty or functionl
ErikDB
15
These Print-in-Place designs might contain some good hints:
https://www.youmagine.com/designs/makey-robot
https://www.youmagine.com/designs/small-box-with-printed-in-place-lid
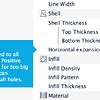
Also, to get tolerances exactly right without changing the original design file, you can expand or contract the toolpaths in the latest Cura releases (2.x). See also the screenshot image I added. Also, real time adjustment to the printer’s flow rate could be helpful in getting things to have gaps of < 0.05 microns and still be separate parts.
If you have a dual extruder, print the part in ABS and the 0.5mm gap in HIPS. Let the finished part sit in Limonene (i order mine from Amazon) for a bit. It will dissolve the HIPS and doesn’t affect the ABS.