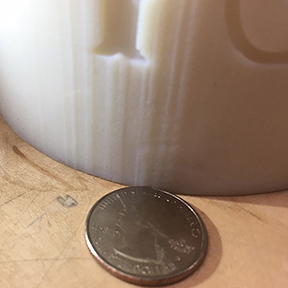
see photo, it’s kinda hard to see, but the lowers layers are not printing correctly, is the bed too hot? using Ultimaker 2
any help would be great
thanks
5 Likes
Mine did this when I first got my printer. I found I had the incorrect filament size programmed into ReplicatorG - also, reducing the fill density seemed to help. Have you attempted a 2x2x2 calibration cube?
The print speed of the first layers may be too high
1 Like
Whats settings are you printing with? Whats the temparature and what type of filament?
Colorfabb traffic red PLA, 210 C nozzle, 60 C bed, quickprint normal setting on ultimaker 2, funny thing is I printed it in blue with the quickprint fast low setting, and it didn’t do this
see better images
ed one
bad bottom,
colorFabb Traffic Red PLA
210 Cº
60 Cº
UM2 Quickprint: Normal Setting
blue one
good bottom, Ultimaker Blue PLA
210 Cº
60 Cº
UM2 Quickprint: Fast/Low Setting
do you think it’s the heated bed, is it too hot?
thanks!
You could try reducing printspeed of the first cm of the model or/ and use randomized starting points
i definitely got to do with the cooling down before the next layer comes in and that is quicker at the bottom!
happy printing
John
1 Like
thanks John! i’ll try that
morgano
9
That looks to me like the first layers aren’t adhering to the base plate properly. I get this too sometimes - I found increasing the extruder temperature to 217C helped - it was as if the PLA was solidifying too quickly before it had a chance to adhere to the bed.
I always print at 230c using colorfabb in my ultimaker 2 at 40mm/s. Printing at 210c i get guaranteed under extrusion. Also have your modified your extruder yet? It definitely helps. Also i tend to use at least 5 rings of brim to guarantee a flat base.
This looks like the typical warping of the layers that are printing outwards, which you get with rounded shapes. During the print (in red for sure in your case) you should see that the outer edge is curling upwards, and that causes the bumpy pattern on the lower ~2 cm. Because on the next layer the nozzle tries to deposit another layer which is being pushed sideways by the curled up layer.
Try to reduce your nozzle temperature slightly during that phase and either shutdown or reduce your cooling fan speed, as the warping of that outer edge comes from the rapid cooling down of the material.
It’s a bit playing with the setting of nozzle temperature and cooling fan speed, but you should be able to find the optimum.
And yes indeed, this behavior of curling is material dependent, like PLA woodfill, PLA glow in the dark, PLA from Ultimaker or PLA from Colorfabb.
Good luck!
Toonie
12
When you bought your UM2, it probably came with a glue stick. Apply some on the bed before print. It works great!
I always print with Colorfabb filaments, 210° for the extruder and 50° for the bed.
You could also try and level your bed again, and place the extruder nozzle a bit closer to the bed so the first layer is a bit squished.
Toonie
13
first layer speed is at 30mm/s with my configuration
Can I just ask is the rest of the print the usual excellent quality you get form the Ultimaker 2 or is it a little rough?
I had a problem like this and worked it our but I found that the bottom layers were like yours but the ones above were not top notch.
Dylan
Toonie
15
I mixed something up I think, forget my previous reply (cant delete it) Could be a combination of overhang and not enough cooling. The quality of the layers gets better towards the top because of the time per layer increases, so more time for the layers too cool down.
The guys over at the ultimaker forums say that it is because the filament is not cooling fast enough and suggest turning the fan to 100% after the first layer.
I have this problem with the bottom portion of my vases I print. My print is small so the section of the vase that had the same issue as the OP was printing without any fan and it wasn’t until I turned the fan on 100% after the first layer that it made any difference.
If the curling effect as you describe it were the cause I would have expected that problem to be worse instead of better with fans full on.
1 Like
If you slow down the print towards the bottom when the total size of each layer is smaller it will give the plastic more time to cool which will fix these issues. The speed can then go back up as your print gets taller. There is a plugin for cura that can help with this. Also, do not slow down your cooling fan, just the print speed.
In the advanced settings of Cura you can also set the minimum cooling time between layers. Adjusting this setting can help with other prints in the future. As an example, if you default setting is 5 seconds then you can increase it to something like 8 seconds to help give a little more time between small layers for the plastic to cool and harden before the next layer is put down.
If the bed was the issue, in this instance, then you would see more deformities in the print in the lower layers.
1 Like
My one year experience with Ultimaker2 tells me that this machine doesn’t deal well with overhangs. Even the tests made by make magazine confirms it. What i discovered printing with PLA is that if i reduce the heated bed temperature to 0° and print at 190°C i reduce a lot this warping phenomenon. The only problem is to mantain the piece sticked to the glass. In that case try use the glue stick and print the first layer at higher temp. and lower speed. To do that you can you the Cura Plugin “Tweak at Z” to reduce temp and higher the speed after the first layer. Make sure you level the bed so the first layer comes out very thin.
I hope this helps!
1 Like


