Hi,
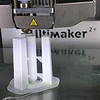
Does anyone have additional practical tips on printing tall & narrow objects? I’m trying for example now to print a stylus in Colorfabb XT @ 250c. I’ve created some sort of a rocket platform on 3 sides to attach it horizontally and to cut it away later with hopefully minimum visible scars.
The challenge is also cooling the lower layers while printing the stylus up. Now using an extra small fan for that.
Any hints or alternatives?
I also tried various other orientations but that went horribly wrong (like warping over the length when put flat, let alone the roundness of the stylus goes out of the windows…)
Thanks,
Alain
1 Like
You can cut it into parts and then glue it back together
2 Likes
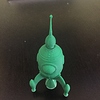
You need cooling. Lots of cooling. Making some ducts to point the air more at the nozzle will help, as will printing another object that is as tall as the stylus, but elsewhere on the build plate. This gives the object time to cool. Good luck, they are tricky to get right. The attached image had a spire that was pretty much one nozzle width (0.4mm) towards the top, I didn’t use a tower next to it, just a good fan duct. A tower next to it would help a lot. I was surprised that it printed this well, tbh.
Try cutting the object down so that you’re just printing the hard thin part, to experiment with different techniques.
1 Like
@Nebbian is correct, just to add…
Increase cooling time setting in your slicer software.
Point a big fan at your build area.
since it’s an Um2+, 250 is not enough. crank it up to 260 and add 60 percent fan at least.
i would suggest printing 2 of these or 3 of these close to each other. that usually helps me. add some small support at the bottom as well so it won;t wobble…
what is the printing failure you are experiencing?